How to Connect Your Radio to the EF Mesh
Welcome! This guide walks you through setting up a brand-new Meshtastic radio for Electric Forest. If you've never touched one of these before, you're in the right place. The setup looks like a lot at first — but you only do it once, and then your radio just works for the entire weekend (and every Forest after).
Don't have a radio yet?
No worries. Check our Recommended Hardware page — there are great options starting around $30. Order it now and it'll arrive before you head to Rothbury.
Find the nerd in your squad
A lot of this setup is "do it once and share." If one person in your crew is a tech nerd, have them do the QR code parts (Step 4 and Step 9) and the rest of you just scan their QR. Easy.
Step 1: Update Your Firmware
This is honestly the most confusing part of Meshtastic, so we get it out of the way first. An up-to-date radio works better, ships with better defaults, and avoids weird bugs.
- Plug your radio into your laptop with a USB-C cable.
- Open Meshtastic Web Flasher in Google Chrome (Firefox and Safari don't support the USB-flashing API).
- Pick your device from the list, click Flash latest, and follow the on-screen instructions.
- If your device needs to be in DFU mode to flash, Google "[your device name] DFU mode" — it's usually a button-hold while plugging in.
Your node identity can get wiped
Updating firmware sometimes resets your radio's identity (the encryption value shown under Settings → Security). If after you update your friends say "we can see each other but not you," that's the cause. Have them each go to the Nodes tab in the Meshtastic app, tap your node, and tap Delete node. They'll re-fetch your new key automatically. Easy fix.
To avoid this entirely: before updating, go to Settings → Security in the Meshtastic app and screenshot the value shown there. Save the screenshot to your notes app. If it gets wiped, just paste the saved value back in.
Step 2: Get the App on Your Phone
Your radio talks to your phone over Bluetooth. You'll do most of the configuring from the phone.
| Platform | Link |
|---|---|
| iPhone | Apple App Store |
| Android | Google Play Store |
| Web (laptop) | client.meshtastic.org — backup option |
iOS and Android both work great. Just download the official Meshtastic app.
Step 3: Pair Your Radio to Your Phone
- Turn on your radio.
- Open the Meshtastic app.
- Tap the + button (add device).
- Your radio should pop up in the list — tap to pair.
- If it asks for a pairing PIN, check the documentation that came with your device or the manufacturer's site.
You should now see your node in the app. If not, restart the radio and try again.
Step 4: Scan the Official EF Channels QR
This is the easy way to load all the Forest-compatible settings to your radio at once. Only one person in your squad needs to do this — they'll then generate a new QR and share it with the rest of you.
Click here to load EF channels onto your radio
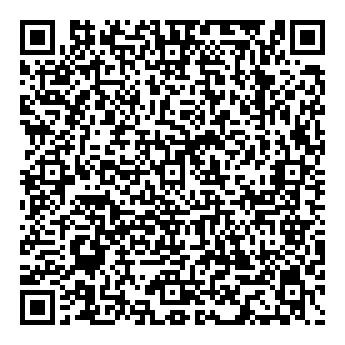
Or scan this from a second phone to bring it into the mesh.
Open this link on the phone that's paired to your radio. It loads four channels — the Meshtastic default primary channel (left unnamed on purpose — see the note below), a chgme-squad placeholder for your squad (customize in Step 8), the public forest-chat, and Weather — all on the Medium Range - Fast preset.
QR code not working? Enter the channels manually
If the QR or link won't load, you can add each channel by hand in the Meshtastic app (Channels → +). Enter the name and paste the matching key below exactly as shown.
| Channel | Name | Key | Notes |
|---|---|---|---|
| Primary (channel 0) | leave the name blank** | AQ== |
The default Meshtastic public channel. See the note below about naming. |
| chgme-squad | chgme-squad (then rename to your crew) |
TBD | Your squad's private channel which you need to generate the key for |
| forest-chat | forest-chat |
oU03W9b8s0vpL0IjhBIIHZtuW/sHui3QDhmlaOLflkk= |
Community forest chat channel |
| Weather | Weather |
Ww== |
Weather updates channel |
Channel names must match exactly
The channel name — including capitalization, spelling, and punctuation is just as important as the key. forest-chat and Forest-Chat are not the same channel. Two channels with different names will not see each other, even if they share the same key. If anything is even slightly off, you won't be on the same channel as everyone else. Type the names exactly as shown above.
Naming the primary channel: leave it BLANK
For the primary channel (channel 0), the right move is to leave the name field blank — exactly like the QR does. A blank primary is what everyone interoperates on.
Here's the part that trips people up. When the name is blank, the two apps display a label for you, and they don't agree:
- iOS shows it as "Primary channel"
- Android shows it as "MediumFast"
Those are just display labels for the same blank/default channel — they interoperate fine. The blank name is what matters, not the label your phone draws.
- ✅ Recommended: leave the name blank.
- ✅ If you insist on typing a name, type exactly
MediumFast(no space, exact capitalization) — this is what Android shows, so it stays compatible. - ❌ Do NOT type
PrimaryorPrimary Channel. Those are not the channel name — they're just what iOS draws on top of a blank one. Typing them gives your channel a real, non-blank name that will not connect to the rest of the Forest mesh.
Stuck? Ask in Discord
Post in the EF Meshtastic Discord thread (not in the Discord? join at discord.gg/electricforest first) — someone in the community is usually around and happy to walk you through it on a quick voice chat.
Step 5: Set Your Radio Settings
Open the Meshtastic app → tap your node → Radio Configuration. There are a lot of settings here. Please don't get creative — changing the defaults will either make your radio incompatible with the Forest mesh or flood the network with traffic.
Here's exactly what to change. Anything not mentioned, leave alone.
LoRa
- Region:
United States← change this if it's not already set - Set Preset:
Medium Range - Fast← this is not the default. Change it fromLong Range - FasttoMedium Range - Fast. Why: the Forest is a dense crowd — hundreds of nodes packed into a few square miles. Medium Fast trades a little range for faster message delivery, lower latency, and way less channel congestion. Better network for everyone when we're all on top of each other. - Transmit Enabled:
On(default — leave it) - Number of Hops:
3(default — leave it) - Frequency Slot:
0(default — leave it)
User
- Long Name: Your festival name / handle
- Short Name: 3–4 characters max (this is what people will see on their map — keep it tasteful)
Device
- Device Role:
Client(leave it) - Rebroadcast Mode:
ALL(leave it)
Do NOT set your role to Router or Repeater
This is the #1 way to break the Forest mesh for everyone. Stick to Client. If you've got an awesome setup at camp and you want to help carry the network, message the EF Discord (not in the Discord? join at discord.gg/electricforest first) before changing this.
Position
- Broadcast Interval:
1 hour - Smart Position:
ON - Smart Minimum Interval:
30 seconds - Smart Minimum Distance:
100 meters - Device GPS:
Enabled - GPS Update Interval:
30 seconds - Position Flags: Turn them all off
No GPS on your radio?
If your radio doesn't have built-in GPS (or it's flaky), you can use your phone's GPS instead. In the Meshtastic app: App Settings → Phone GPS sharing → Enabled. Make sure your phone's location permission for Meshtastic is set to Always.
Store & Forward
- DO NOT ENABLE THIS. Just leave it off.
External Notifications (optional — quiet your radio)
Hate the beeps and buzzes? Turn these off:
- Alert GPIO buzzer when receiving a bell:
OFF - Alert GPIO vibra motor when receiving a bell:
OFF - Alert GPIO buzzer when receiving a message:
OFF - Alert GPIO vibra motor when receiving a message:
OFF
Step 6: Save and Reboot
Hit Save in the app. Your radio will reboot every time you save. Wait for it to reconnect (top-right indicator turns green) before you do the next step. Always confirm the settings stuck.
Step 7: Check Your Channels
You should now see four channels in the Channels tab:
- The primary channel (channel 0) — leave it alone, this is the default Meshtastic channel. It has no name set, so your phone shows you an auto-generated label: iOS displays "Primary channel", Android displays "MediumFast". Both are the same blank/default channel and they interoperate fine — don't "fix" the label by typing a name.
- chgme-squad — placeholder for your squad (you'll customize in Step 8)
- forest-chat — public EF community chat — leave it alone
- Weather — posts the current weather every hour and a forecast at the beginning of every day. Major weather warnings go to the primary channel.
Step 8: Set Up Your Squad's Encrypted Channel
Tap chgme-squad. This is the channel for just you and your friends.
- Change the Name to something unique to your crew — like
disco-ducksortaco-tuesday. - Tap the blue lock icon to generate a fresh channel key. This is critical — it gives your squad channel a unique encryption identifier so other Forest folks can't snoop on your group chat.
- Enable Allow Position Requests (so your squad can ping for your location).
- Enable Precise Location (so location shares are accurate to meters, not hundreds of meters).
- Leave MQTT uplink/downlink disabled.
Hit Save. Wait for the radio to reboot and reconnect.
Step 9: Share With Your Squad
In the Meshtastic app: Settings → Share Channel QR Code.
- Make sure all 4 channels are selected (Primary, your squad channel, forest-chat, Weather).
- Double-check your squad channel name is right.
- Click Share QR Code and send the QR (or link) to everyone in your crew.
Each squad member opens the link/QR on their paired phone — and boom, they're in.
Step 10: Test It
Once everyone's scanned, you all have:
- The standard EF primary channel (for hearing everyone)
- An encrypted channel just for your squad
- The public
forest-chatfor the wider Forest community
Send a "hello world" message in the squad channel. If you all see it, you're golden.
Test it at home BEFORE Forest
Seriously. Don't wait until you're in Rothbury to figure this out. Get your squad together at someone's house, do the setup, drive around your neighborhood. The Meshtastic learning curve is real but it's small — get past it in the comfort of wifi.
What Now?
- Recommended Settings — deeper dive on broadcast intervals, GPS, and getting the most out of your node
- Camp Nodes — want to help build the mesh? Set up a high-altitude node at your camp
- Troubleshooting — common gotchas and fixes
Stuck? We've Got You.
The EF Meshtastic crew lives in the official Electric Forest Discord. We're friendly, we love getting more people on the mesh, and there are no dumb questions.
Not in the Discord? Join at discord.gg/electricforest first.